Linear encoders help eliminate errors from thermal drift. || Dr. Jens Kummetz, R&D Manager, HEIDENHAIN, Traunreut, Germany
Thermal accuracy of machine tools is becoming increasingly important considering the strongly varying operating conditions in manufacturing. Especially with small production batches that require constantly changing machining tasks, a thermally stable condition can’t be reached. At the same time, the accuracy of the first workpiece is becoming very important for the profitability of production orders. Constant changes between drilling, roughing and finishing operations contribute to the fluctuations in the thermal condition of a machine tool. During the roughing operations, the milling rates increase to values above 80%, whereas values below 10% are reached during finishing operations. The increasingly high accelerations and feed rates cause heating of the recirculating ball screw in linear feed drives. Position measurement in the feed drives therefore plays a central role in stabilizing the thermal behavior of machine tools.

Thermal stability of machine tools
Solutions for avoiding thermally induced dimensional deviations of workpieces have become more crucial than ever for the machine tool building industry. Active cooling, symmetrically designed machine structures and temperature measurements are already common practice.

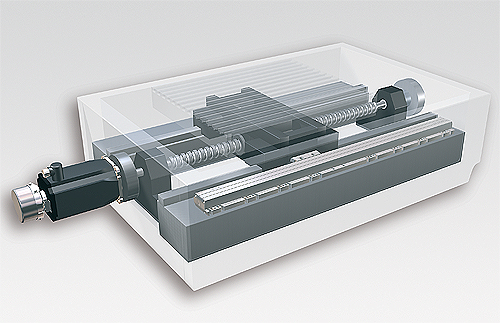
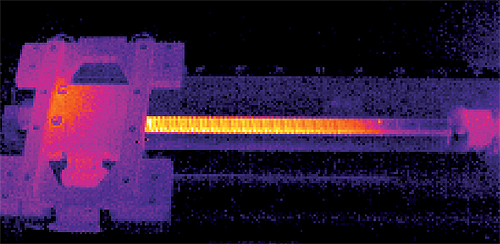
Thermal drift is primarily caused by recirculating ball screws on feed axes. The temperature distribution along the ball screw can rapidly change as a result of the feed rates and the moving forces. On machine tools without linear encoders, the resulting changes in length (typically: 100 μm/m within 20 min.) can cause significant flaws in the workpiece.
Position measurement on feed drives
The position of an NC feed axis can be measured in principle through the ball screw in combination with a rotary encoder or through a linear encoder.
If the slide position is determined from the pitch of the feed screw and a rotary encoder, then the ball screw must perform two tasks: As the drive system it must transfer large forces, but as the measuring device its expected to provide highly accurate values and to reproduce the screw pitch. However, the position control loop only includes the rotary encoder.
Because changes in the driving mechanics due to wear or temperature cannot be compensated, this is called semiclosed-loop operation. Positioning errors of the drives become unavoidable and can have a considerable influence on the quality of workpieces.

If a linear encoder is used for measurement of the slide position, the position control loop includes the complete feed mechanics. This is therefore referred to as closed-loop operation. Play and inaccuracies in the transfer elements of the machine have no influence on the accuracy of the position measurement. Measurement accuracy depends almost solely on the precision and installation location of the linear encoder.
This basic consideration applies both for linear axes and rotary axes, where the position can be measured with a speed-reduction mechanism connected to a rotary encoder on the motor, or with a highly accurate angle encoder on the machine axis. Using angle encoders produces significantly higher accuracy grades and reproducibility.
Additional measures for semiclosed-loop operation
In order to prevent heating of the ball screw and the surrounding parts of the machine, some ball screws feature hollow cores for coolant circulation. In semiclosed-loop operation, the positioning accuracy is affected by thermal expansion of the ball screw and thus depends on the temperature of the coolant. A temperature increase of only 1 K results in positioning errors up to 10 μm over a traverse range of 1 m. Common cooling systems, however, are often unable to restrict the temperature variations to values significantly below 1 K.
For drives in semiclosed-loop operation, thermal expansion of the ball screw is occasionally approximated using a model in the control. Because the temperature profile is difficult to measure during operation and is influenced by numerous factors – such as the wear of the recirculating ball nut, the feed rate, the cutting forces, and the traverse range used – considerable residual errors up to 50 μm/m can occur when this method is used.
The ball screw is sometimes provided with fixed bearings at both ends in order to increase the rigidity of the drive mechanics. But even very rigidly designed bearings cannot prevent expansion caused by local heat generation. The resulting forces are considerable. They deform the most rigid bearing configurations and can even cause structural distortions in the machine geometry. Mechanical tension also changes the friction behavior of the drive, thus adversely affecting the contouring accuracy of the machine.
Due to these restrictions, the drive accuracy that can be attained by taking the described additional measures cannot be compared with closed-loop operation using linear encoders. Also, the additional measures for semiclosed-loop operation cannot compensate the effects of changes in the bearing preload due to wear, or elastic deformations of the drive mechanics.
Effect of drive accuracy on the manufacture of parts
In the machine building industry the demand for small parts manufactured in small production runs is increasing considerably. The accuracy of the first workpiece is therefore becoming an important factor for the profitability of manufacturing companies. Machine tools for high-accuracy production of small batches are facing a real challenge. Constant changes between setting up the workpiece, drilling, roughing and finishing cause constant changes in the thermal condition of a machine.
The typical feed rates for roughing a workpiece range from 3 to 4 m/min, whereas feed rates from 0.5 to 1 m/min are used for finishing. Rapid traverse movements during tool exchange also considerably increase the average velocities. The medium feed rates during drilling and reaming are negligible for heat generation in recirculating ball screws. Due to the strongly varying feed rates, the temperature distribution along the ball screws changes during the individual process steps. In semiclosed-loop operation the varying loads on the recirculating ball screw may cause the workpiece accuracy to suffer, even if the workpieces are completely machined in just one setup. Machine tools with linear encoders in closed-loop mode are therefore absolutely necessary for high-accuracy production of small parts.
Example of machining several parts from one blank form
An aluminum blank with a length of 500 mm is first drilled and then reamed on a machine tool. The medium feed rates during the two machining operations are low, so the heat generation in the recirculating ball screws is negligible. In the next production step the contour is milled and the medium feed rate increases significantly, resulting in considerable heat generation in the ball screws.
If the milling machine is operated in semiclosed-loop mode, thermal expansion of the recirculating ball screws causes deviations between the drilling pattern and the milling pattern.The maximum deviations of 135 μm were measured near the loose bearings of the ball screw. In closed-loop operation these errors can be completely avoided.
The functional dimension between the position of the hole and the bisecting line of the individual workpiece is 12 mm and must meet tolerance grade IT8. This results in a permissible deviation of ±13 μm. All of the workpieces machined in closed-loop mode are significantly within this tolerance. Deviations up to 135 μm were measured in semiclosed-loop mode. Thus the workpiece only complies with tolerance grade IT13 instead of meeting the required tolerance grade IT8.
Example of machining a coupling lever for an aerofoil
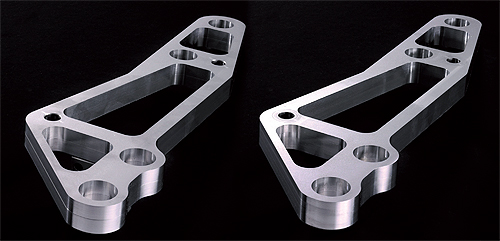
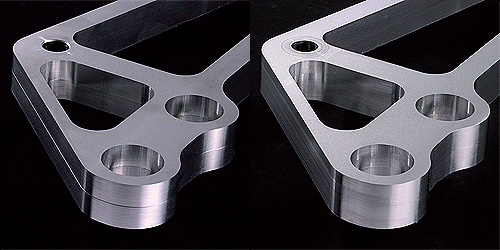
Another example describes the manufacturing of a coupling lever, requiring the machining of two holes at distance of 350 mm from each other with a tolerance grade of IT7. The integral component is manufactured twice from the same blank form to permit evaluation of the accuracy that can be achieved in semiclosed-loop mode. The second workpiece is simply machined 10 mm below the first. Between the two machining operations, twenty machining cycles for the same part are executed above the blank.


In semiclosed-loop operation, the contour of the second workpiece deviates from the contour of the first workpiece. The farther the drives move away from the fixed bearings of the recirculating ball screw during machining, the more obvious the thermal expansion of the ball screw becomes.
The required functional dimension of 350 mm with a tolerance grade of IT7 corresponds to a permissible deviation of ± 28 μm. The second workpiece machined in semiclosed-loop mode is unable to meet this requirement. The deviation is 44 μm. With the use of linear encoders in closed- loop mode in this test, no edge results.
The residual deviations of 10 μm that occur in closed-loop operation are due to thermally induced, structural distortions of the machine geometry. The specified dimensions for the two bore holes can even be improved to IT5.
Example of 3-D milling of freeform surfaces
Another example illustrates the machining of a mold with the classic profile of the Watzmann – a legendary mountain in the German Alps. A 500-mm long workpiece is machined with multipass, climb and upcut milling cycles in the X direction, using a ball-nose cutter with a diameter of 12 mm and a maximum feed rate of 4.5 m/min. It takes around 60 minutes to machine the contour with an infeed of 0.2 mm in the Z and Y directions. The high feed rate of 4.5 m/min together with the constant accelerations and decelerations generate heat in the recirculating ball screw and cause thermally induced linear deviations of 130 μm in semiclosed-loop operation. Because the linear deviation with this mold component is difficult to visualize, machining was deliberately begun in the middle of the workpiece. Start and end paths therefore lie side by side and clearly show the thermal drift. The farther the workpiece position is away from the fixed bearing, the higher the thermal drift is.
In order to fulfill the high requirements of mold and die making, it’s necessary to compensate the expansion of ball screws by using accurate linear encoders.
Summary
The successful fulfillment of manufacturing orders requires machine tools with high thermal stability. Machine accuracy must be maintained even under strongly varying load conditions. As a consequence, feed axes must achieve the required accuracy over the complete traverse range even with strongly varying speeds and machining forces. Thermal expansion in the recirculating ball screws of the linear feed axes adversely affects accuracy and varies depending on the velocity and load. Position errors of 100 μm and more may result within 20 minutes during a machining operation if the slide position is only determined from the spindle pitch and a rotary encoder. Because essential drive errors are not compensated in the control loop when this method is used, this is referred to as semiclosed-loop operation of the feed drive. These errors can be completely eliminated by using linear encoders. Feed drives with linear encoders are operated in closed-loop mode because errors in the recirculating ball screw are considered in position measurement and compensated in the position control loop. Angle encoders used on rotary axes provide similar benefits since the mechanical drive components are also subject to thermal expansion. Linear and angle encoders therefore ensure high precision of the components to be manufactured even under strongly varying operating conditions of the machine tools.
HEIDENHAIN Corp.
www.heidenhain.us
 Read more about linear encoders —
including various ways to measue linear distances, how linear encoders improve accuracy, the first consideration in choosing a linear encoder, and IoT functionality with linear encoders — at linearmotiontips.com/category/linear-encoders.

Leave a Reply
You must be logged in to post a comment.